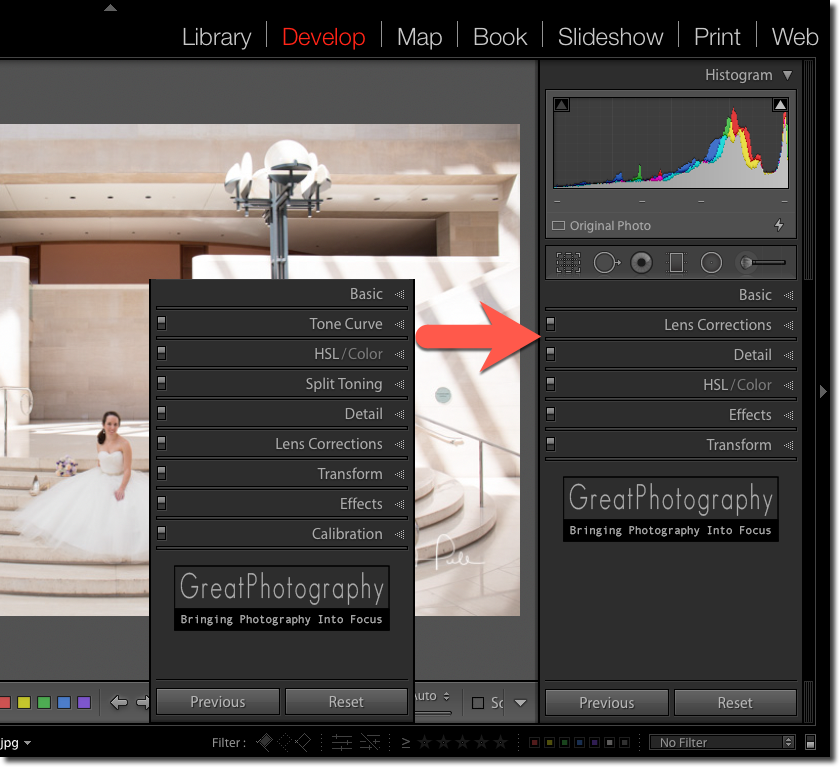
Here’s one of those little improvements that is certainly not earth shattering, but it does improve the Lightroom Classic CC workplace. Combine it with a long time feature and you've got a completely customizable workplace.

Last week we talked about using the Camera Profile settings to get your Lightroom Classic CC preview images to match the image you saw on the back of your camera. It’s not a long process but wouldn’t you like to make that setting the default when you import images?
You can. In fact, you can make a wide variety of Develop setting the default for any imported images. Just make sure that the adjustments that you set as defaults are something that you want to apply to ALL images.
Whenever you add RAW images into Lightroom’s catalog, there is one step that is critically important. Essentially you have to tell Lightroom how your camera is set up. If you don’t, you’ll have a devil of a time trying to get the images you see in Lightroom to match the preview displayed on the back of your camera.
Last week we used a photo of the correct time that was shot from each camera. That certainly makes the process of synchronizing the data easy and accurate. But what if you didn’t remember to shoot a photo of the correct time. You can still synchronize all the images but realize that you are going to sacrifice accuracy.
You know that feeling. You’re working in Lightroom and something just isn’t right. Suddenly it hits you - like a lightning bolt. The original files from your camera are gone. It sends a chill down your spine and gives you that horrible sinking feeling. Now what? You may have just moved the originals and can reconnect them. Or, they may be gone - even from the memory card.

All may not be lost. There’s a good chance that you can recover something from your images. The key is understanding how Lightroom works.

The exclamation point in a dotted box tells you that Lightroom can not locate the original file.
When you “import” a file into Lightroom, you really don’t. Yes, that’s what I mean. Read that sentence again. Lightroom never really “imports” anything. It may put your originals into a folder somewhere, but they never reside inside Lightroom. Instead, what you see when you use the program is a preview image.
The image you see in Lightroom is a JPEG file that is stored inside the Lightroom catalog. Lightroom calls them previews, and they can be a very small thumbnail or have the dimensions of your original file. Regardless of size, Adobe has provided a nifty script that can be installed in Lightroom which gives you the capability of extracting the JPEG previews and creating a separate file. You can then edit this file just as you would any other image file.
Search the Adobe help site for an article titled Extract Preview for Lost Images. In that article, you'll see instructions for how to install the script and also how to run the script. It's really straightforward, just follow the directions provided. The only stumbling block that I can see is that you need to be very careful what folder you put the script in.

After installing the script and restarting Lightroom you should see the script icon next to the Help menu. It may look different in Windows and Mac but the function will be the same.
A word of caution, in step 3 of the instructions you’ll click a button “Show Lightroom Presets Folder…”, and this will display a folder for all Adobe products. You should see another folder called Lightroom. It is that folder in which you must copy the downloaded script.
Running the script is pretty straightforward. It simply asks you for a file location. This is where you want the newly created files to be stored. I’d suggest a unique folder so that when you’re done, the only contents of the folder are your new files.
It’s going to create a new image file for each of the selected photos. You can extract a single image, or select multiple images.
When it's done, you’ll find a new JPG file with the name of the original file appended with the size of the image. For example, if you’re original file was IMG_1234.CR2, then the new file will be IMG_1234-[pixel width]x[pixel height].jpg.
The pixel dimensions all depend upon the size of the preview that Lightroom has in its catalog. If you’re lucky enough to have 1:1 previews, you’ll see pixel dimensions that should match what you get out of your camera.
After extracting a preview file, I imported the extracted file and compared it to the original preview in Lightroom. As you can see, the color isn't the same but because I had a 1:1 preview, the amount of detail in the file matches the original. Not perfect but I can live with this. (This is Compare View zoomed to 1:1 - showing a portion of the image above.)
This method of image recovery does NOT bring back the original image. There is bound to be some loss of quality, especially if Lightroom does not have a 1:1 preview of the photo available. Even so, it can be a lifesaver as long as you understand the shortcomings.
The Adobe script can be a lifesaver but it doesn't magically bring back your original file. This is one of those tools that should be a last resort. To avoid needing this solution, make sure you have a good backup system in place and keep it up to date.
Now there are a lot of things you can do to polish an image like this. In Lightroom, you can adjust your white balance and tone until it looks right to you. You can also use a program like Luminar or Skylum’s Aurora to process the image. Remember it’s like cooking - do what you like until you like it. What I want to focus on today are two other changes that I made to the image that made a significant improvement to the image.
The equipment and software we use are getting smarter and smarter every day. It’s amazing what our cameras can do today. And with the latest rounds of updates of Adobe software, we see the addition of artificial intelligence. The latest versions of Lightroom and Photoshop can literally learn how to best edit our images.
Range masking is a feature of the local adjustment tool that will allow you to limit the adjustment to a range of colors or tones in your image. You'll find Range Masking in both Lightroom Classic and Adobe Camera Raw. As a part of the local adjustment tool, these adjustments are completely non-destructive and can be edited later on.
When you’re done shooting you have a lot of RAW photos that look great on the back of the camera. Then you download them into Lightroom and you’re presented with a gallery full of flat, lifeless images. So, what happened to what you saw on the camera?
If you can’t seem to get great RAW images straight out of the camera then you may have a problem with your workflow. And, it’s not a problem that is unique to any one manufacturer. Instead, it’s how RAW files are processed in your workflow.
How often have you sorted through a batch of photographs only to wonder where a particular image was shot? We’ve all done this. Some have tried to keep detailed travel journals - that certainly helps. For others, the location information is simply lost over time. I can’t tell you how many photos I’ve found that illustrate our family history but there is no information about where the image was captures - let alone any other identifying information. Location information adds a great deal to the story of any image. Learn how to add it to your image files and organize it in Lighroom.
Your digital camera produces some pretty odd file names that are not very useful in a well designed workflow. Whether you use these names or not is totally up to you. I'd suggest that you rename your files but before we do that it's a good idea to understand a little more about file names that your camera produces. There is value there - so, as they say, we don't want to "throw out the baby with the bathwater".